Welcome to LiveStorage!
The Toolbar at the top of the window provides quick and easy buttons for many useful features. From left to right, the buttons operate as follows:
![]()
New Design: Click this button to begin a new design. Note: when LiveStorage is initially launched, the program is already set for a new design.
Open a Design: Click to open a previously saved design (.lsf file)
Save: Save the design you are currently working in. If this design has not been saved under a specified name, a dialogue box will open, prompting you to name the file, and choose a location to save it to.
Add Room: Click this button to add additional rooms to the design, designated by tabs with room numbers or names above the work area.
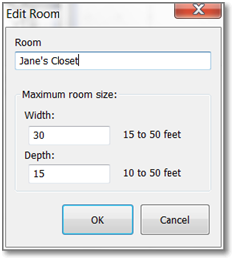
Edit Room: This button allows you to give a name to each room, and also to determine the maximum dimensions of the room (or work area) by launching a dialogue box where you can manually enter the width and depth of the room, within a range: Width can be 15-50 feet, and depth can be 10-50 feet.
Delete Room: When there is more than one room in a project, you can click the Delete Room button to eliminate the currently selected room.
Undo: Clicking the Undo button reverses the last action done in the program. Clicking Undo multiple times will reverse multiple subsequent actions.
Redo: The Redo button is inactive until an action has been undone. After clicking the undo button, the redo button will become active for use. Click redo to reverse an undo action.
Zoom In: To see a small area of your 2D design in closer detail, select the 2D Zoom In button on your tool bar. Next, you will click and drag to create a box around the area you wish to focus on. The selected area will fill your work area. From there, you can repeat the above steps to zoom in even closer in a specified are of your currently zoomed view (this can be repeated multiple times to get as close as you want).
Zoom Out: To zoom back out, select the 2D Zoom Out button on your tool bar. This button will bring your design back to the selected wall fitting to the view screen.
Help: The Help button launches helpful tips, instructions, and tutorials from the LiveStorage website.
About LiveStorage: This button launches a window with version and build information for your LiveStorage software, as well as a link to copyright information.
Angle Snap: This drop-down selection allows you to determine what incremental degree of angle the walls and items in you drawing will snap to.